Third partys
This guide will walk you through setting up Configarr in 3rd party services.
As this is new and you are missing some services feel free to create a PR!
Contributions welcome!
Proxmox VE Helper-Scripts
Thanks to Community User @finkerle we have now an installation script for Proxmox users! With the script you can install & update the configarr version in your proxmox instance automatically. The instance will be deployed as an LXC Container.
Check it out here Configarr Proxmox Helper.
Unraid
Existing apps in Unraid CA are not maintained by us! If donating it is not directed to us! Please check configarr Github pages if you want to donate. Contributions welcome!
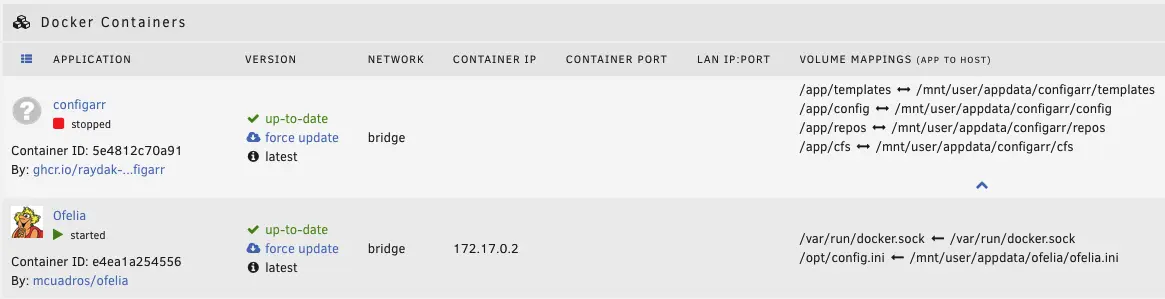
Setting up in Unraid with docker is straigth forward and combined with ofelia we can schedule the containers easily.
HINT: The provided Apps in Unraid are not maintained by us!
Make sure to enable Advanced/extended view in Unraid (top right).
-
Configarr:
Name: configarr (we need this later on)
Repository: configarr/configarr:latest # Recommendation: use tags like 1.9.0

(add volume mappings like your setups requires it. Example with <name> - <host/unraid path>:<container path>)
Config volume - /mnt/user/appdata/configarr/config:/app/config
Repo cache - /mnt/user/appdata/configarr/repos:/app/repos
Custom formats - /mnt/user/appdata/configarr/cfs:/app/cfs
Templates - /mnt/user/appdata/configarr/templates:/app/templates- Add other variables or mapping as your setup requires it
- Afterwards create the required files in the config volume
config.ymlandsecrets.yml(check examples or this guide)
-
Ofelia (scheduler):
Name: ofelia
Repository: mcuadros/ofelia:latest # Recommendation: use specific tags not latest
Post Arguments: daemon --config=/opt/config.ini

(add volume mappings like your setups requires it. Example with <name> - <host/unraid path>:<container path>)
Docker socket - /var/run/docker.sock:/var/run/docker.sock (Read Only)
Ofelia config file - /mnt/user/appdata/ofelia/ofelia.ini:/opt/config.ini (Read only)- Make sure to create the
ofelia.inifile best before starting the container
[job-run "run-configarr-existing-container"]
schedule = @every 10s # adjust as required. Recommendation every 3h or so
container = configarr # this is the name of container we gave- you can also activate
autostartfor ofelia
- Make sure to create the
Now start both containers. Check the logs if configarr works as expected (exit code should be 0). Ofelia should keep running and restarting the configarr in your defined interval.
Enjoy!
Synology NAS
For scheduled runs on Synology you can use the Task Scheduler in order to run configarr in a cron way.
To configure a scheduled task in DSM 7.2 you go to Control Panel - Services - Task Scheduler. From there you can create a new Scheduled Task (User-defined script).
As Synology requires root permission to run docker containers, "root" should be chosen as the user. Then within the Schedule tab you can choose your preferred frequency to run configarr.
For the actual user-defined script you just input the docker run command you also use in an interactive terminal, but be sure to NOT include sudo in your command (as your already run the command with root permissions). Like so:
docker run -d --rm --name=configarr -e TZ=[YOUR-TIMEZONE] -v /[SYNOLOGY-VOLUME]/[SYNOLOGY-SHARED-FOLDER-OF-YOUR-DOCKER-CONTAINERS]/[CONFIGARR-SUBFOLDER]:/app/config ghcr.io/raydak-labs/configarr:[REQUIRED-VERSION]
For example:
docker run -d --rm --name=configarr -e TZ=Europe/Amsterdam -v /volume1/docker/configarr:/app/config ghcr.io/raydak-labs/configarr:1.12.0
Alternatively if you want to be able to view the logs within Synology's Container Manager after configarr has finished running, then you could remove the --rm flag and start the user-defined script with docker rm configarr so that the container is not immediately removed after it has finished running. For example:
docker rm configarr
docker run -d --name=configarr -e TZ=Europe/Amsterdam -v /volume1/docker/configarr:/app/config ghcr.io/raydak-labs/configarr:1.12.0
After clicking "OK" it will ask for your password, given that you created a scheduled script with root permissions. After you're done you can perform a run manually to check if everything works by selecting the task and press "Run".
NixOS Module 1.18.0
NixOS module support is experimental and available from version 1.18.0 onwards.
Configarr can be run as a systemd service on NixOS using the included NixOS module.
Setup
Include the configarr input in your flake:
inputs.configarr.url = "github:raydak-labs/configarr";
Then import the module and configure the service:
{
  config,
  inputs,
  ...
}: {
  imports = [
    inputs.configarr.nixosModules.default
  ];

  services.configarr = {
    config =
      # yaml
      ''
        radarr:
          radarr_instance:
            api_key: !env RADARR_API_KEY
            base_url: http://localhost:${toString config.services.radarr.settings.server.port}
            media_naming:
              folder: default
            root_folders:
              - /mnt/movies/English
      '';
    enable = true;
    environmentFile = "${config.sops.templates.configarr-ev.path}";
  };

  sops = {
    secrets = {
      radarr-api-key.sopsFile = ./secrets/radarr-api-key;
    };
    templates.configarr-ev = {
      content = ''
        LOG_LEVEL=debug
        LOG_STACKTRACE=true
        RADARR_API_KEY=${config.sops.placeholder.radarr-api-key}
      '';
      inherit (config.services.configarr) group;
      owner = config.services.configarr.user;
    };
  };
}
This configuration sets up configarr as a systemd service with proper secret management using sops-nix.
Updating to a New Version
To update configarr to a new version, you need to update both the version number and the corresponding hashes in the nix package file.
- Edit
nix/package.nixand update theversionfield to the desired release (e.g.,"1.18.0") - Update the
revfield infetchFromGitHubto match:"v1.18.0" - Set both hash fields to empty strings (
hash = "";) - Run
nix build- it will fail and provide you with the correct hashes - Copy the hash from the error message for
fetchFromGitHuband update thesrc.hashfield - Run
nix buildagain - it will fail again for the pnpm dependencies - Copy the hash from this error message and update the
pnpmDeps.hashfield - Run
nix buildonce more - it should now succeed
Alternatively, you can find the source hash directly on GitHub:
- Go to
https://github.com/raydak-labs/configarr/releases/tag/v[VERSION] - Download the source tarball and calculate its hash using
nix hash file [downloaded-file]